手势操控虚拟计算器
bigfly Lv4

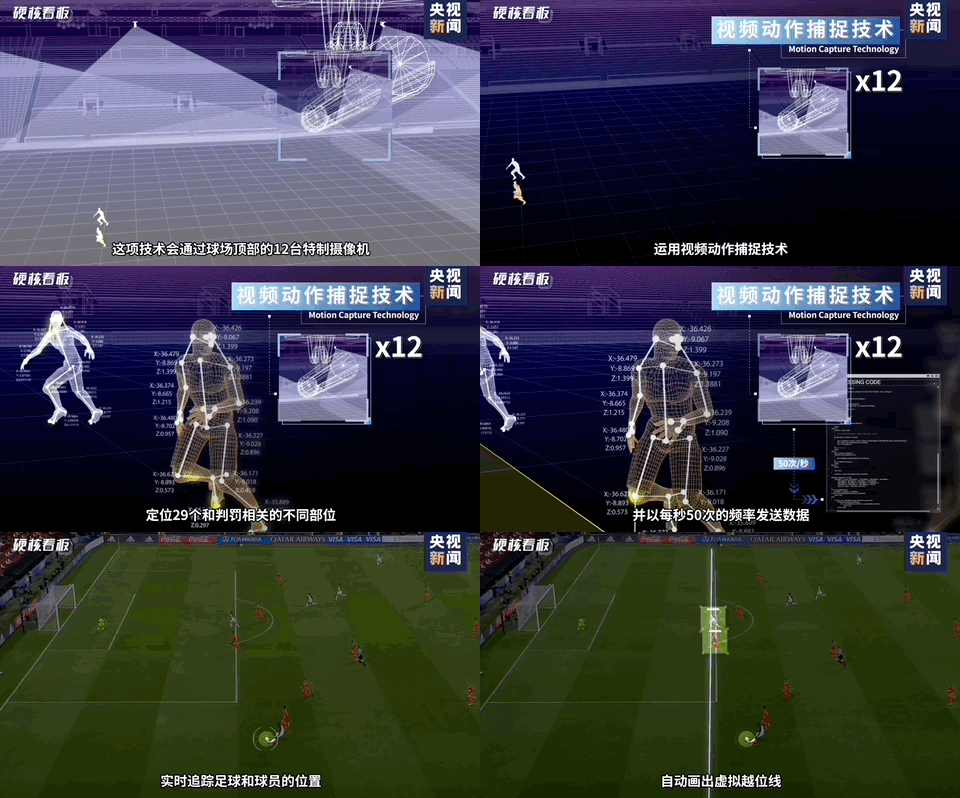
在过去的2022卡塔尔世界杯中,我们可以看到其用到了各种先进的技术,其中有一项是比较吸引我的,那就是半自动越位技术。这项技术的其中的一个分支就是我今天要说的内容。如下图所示。球员身上的关键点检测技术就是今天要说的内容。
image


二、关键点检测的分类及应用

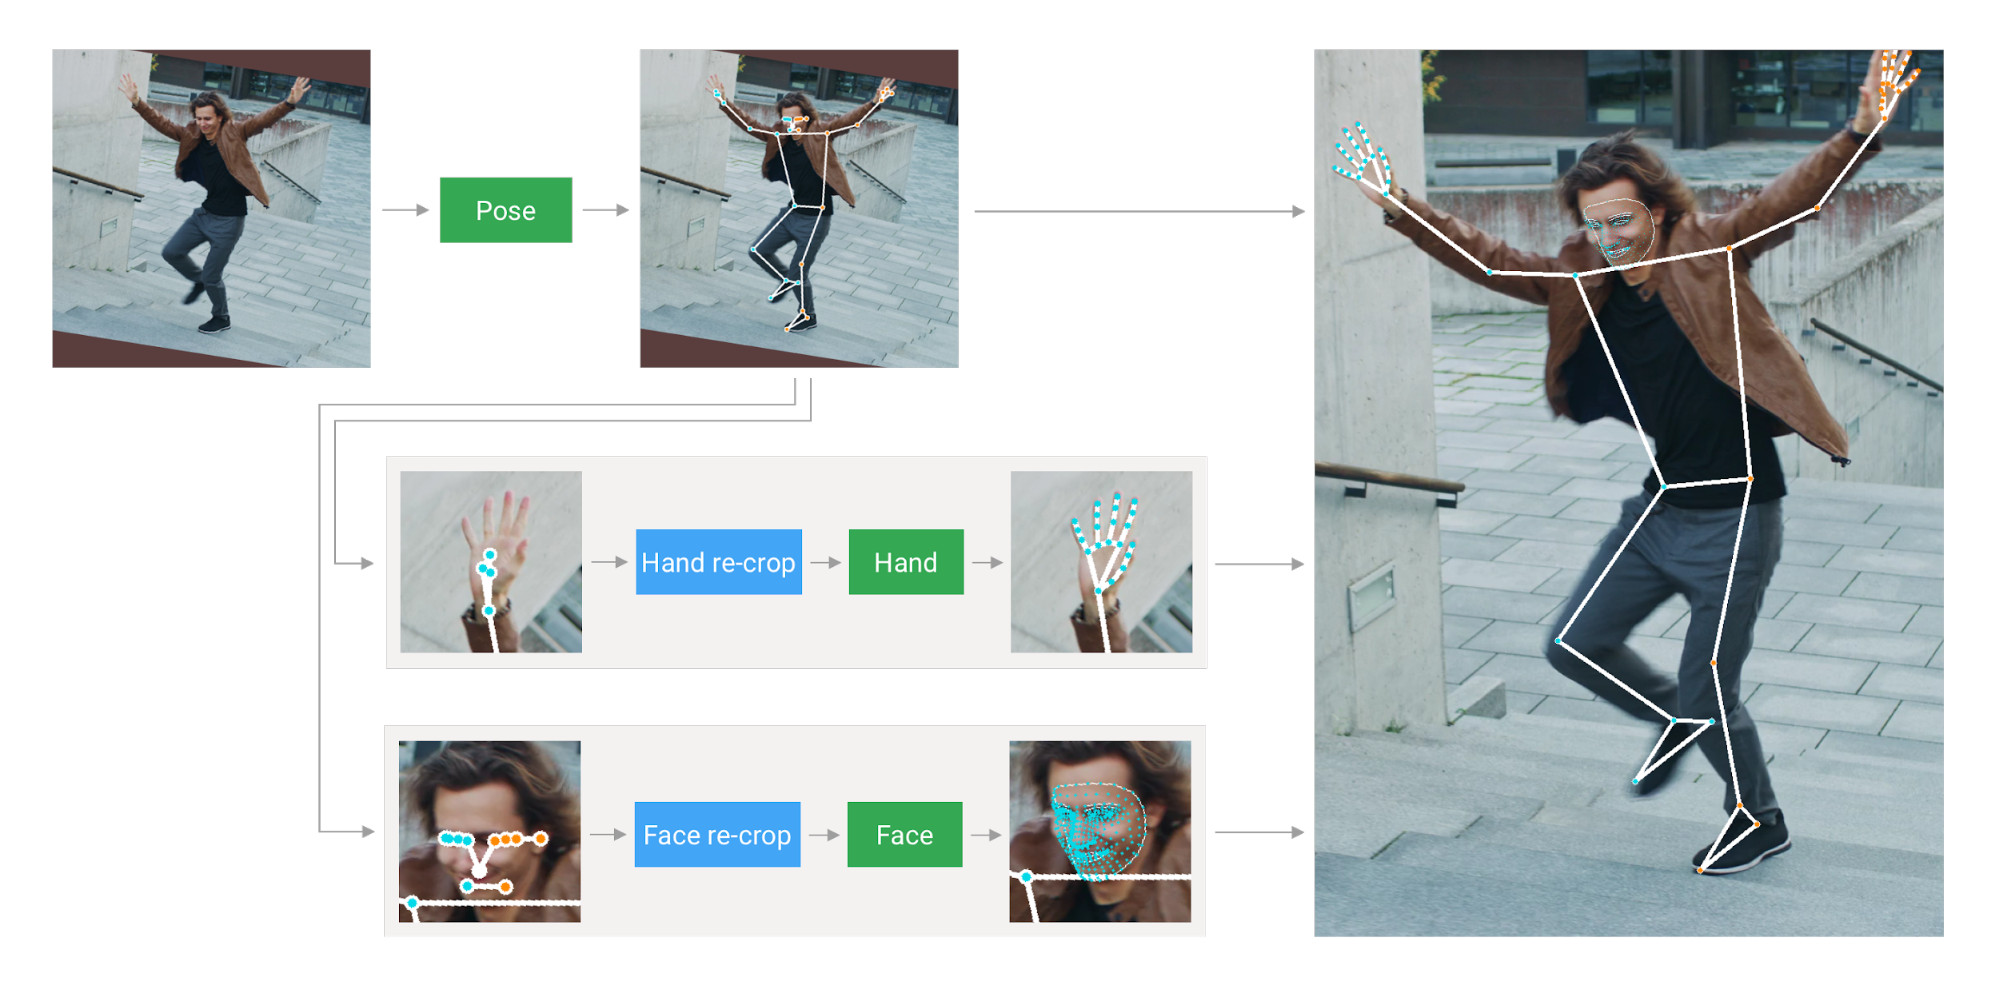
除了我们看到足球比赛中所用的半自动越位识别技术(SAOT),还有其他的关键点检测技术,大致可以划分为三类:pose、face、hand。

下面是在Google提供的开源工具箱MediaPie[2]中找到的相关资料,大家有兴趣可以自行去查看相关内容。
image

从这里我们不难看出,球员身上的检测是基于Pose,也就是姿态的检测。那基于Pose 的关键点检测还有哪些应用?

笔者给出以下应用场景:运动指导、深度学习摔倒检查、基于深度学习的犯罪嫌疑人行为预测等方面。

基于脸部的关键点检测应用场景主要有:表情识别、情绪分析、脸部定位等。

由于今天主要讲解手部关键点检测所以对姿态和脸部的关键点检测介绍就到这里,感兴趣的话可以去查询相关资料文献。

这里给大家展示手部关键点检测在华为Mate40手机中的应用。

三、手部关键点检测原理
image

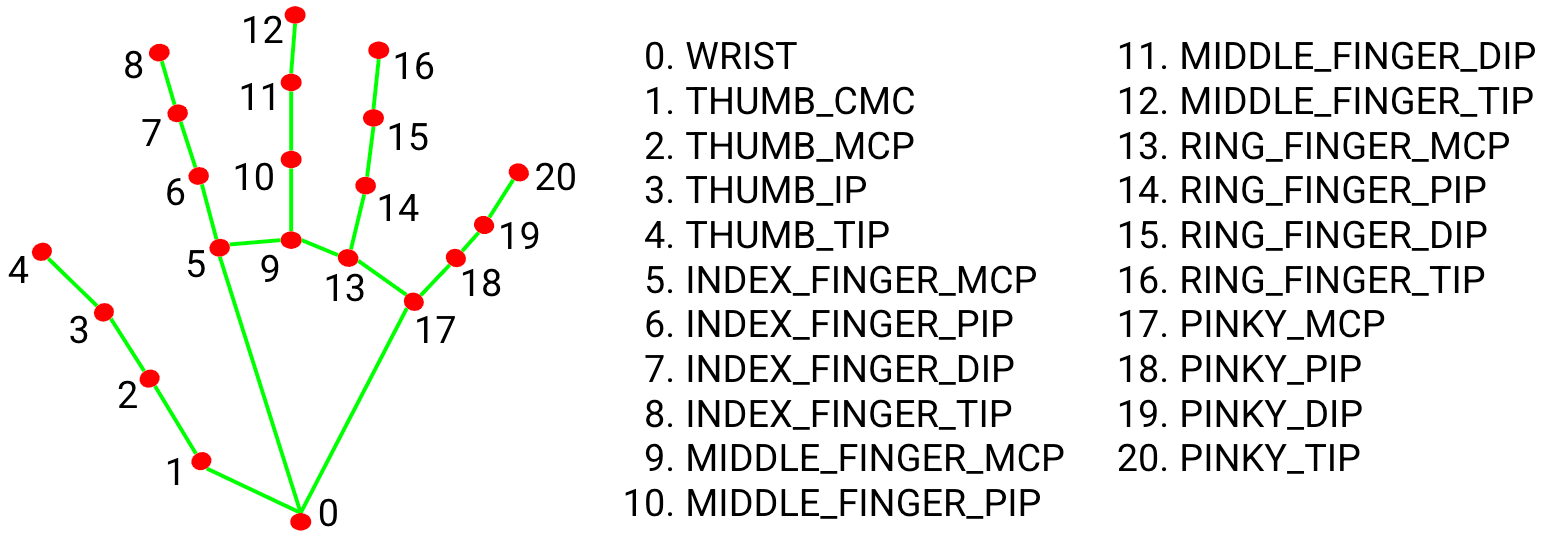
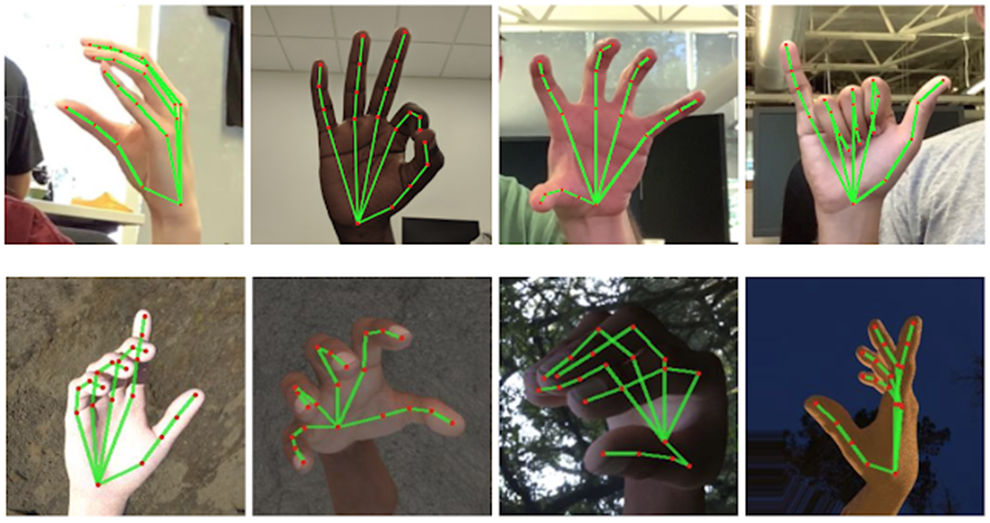
这里的展示的手部关键点检测时基于Google的开源项目进行讲解,用到的方法是检测手部21个关键点,从而确定手部轮廓,达到手部关键点检测的目的。
image

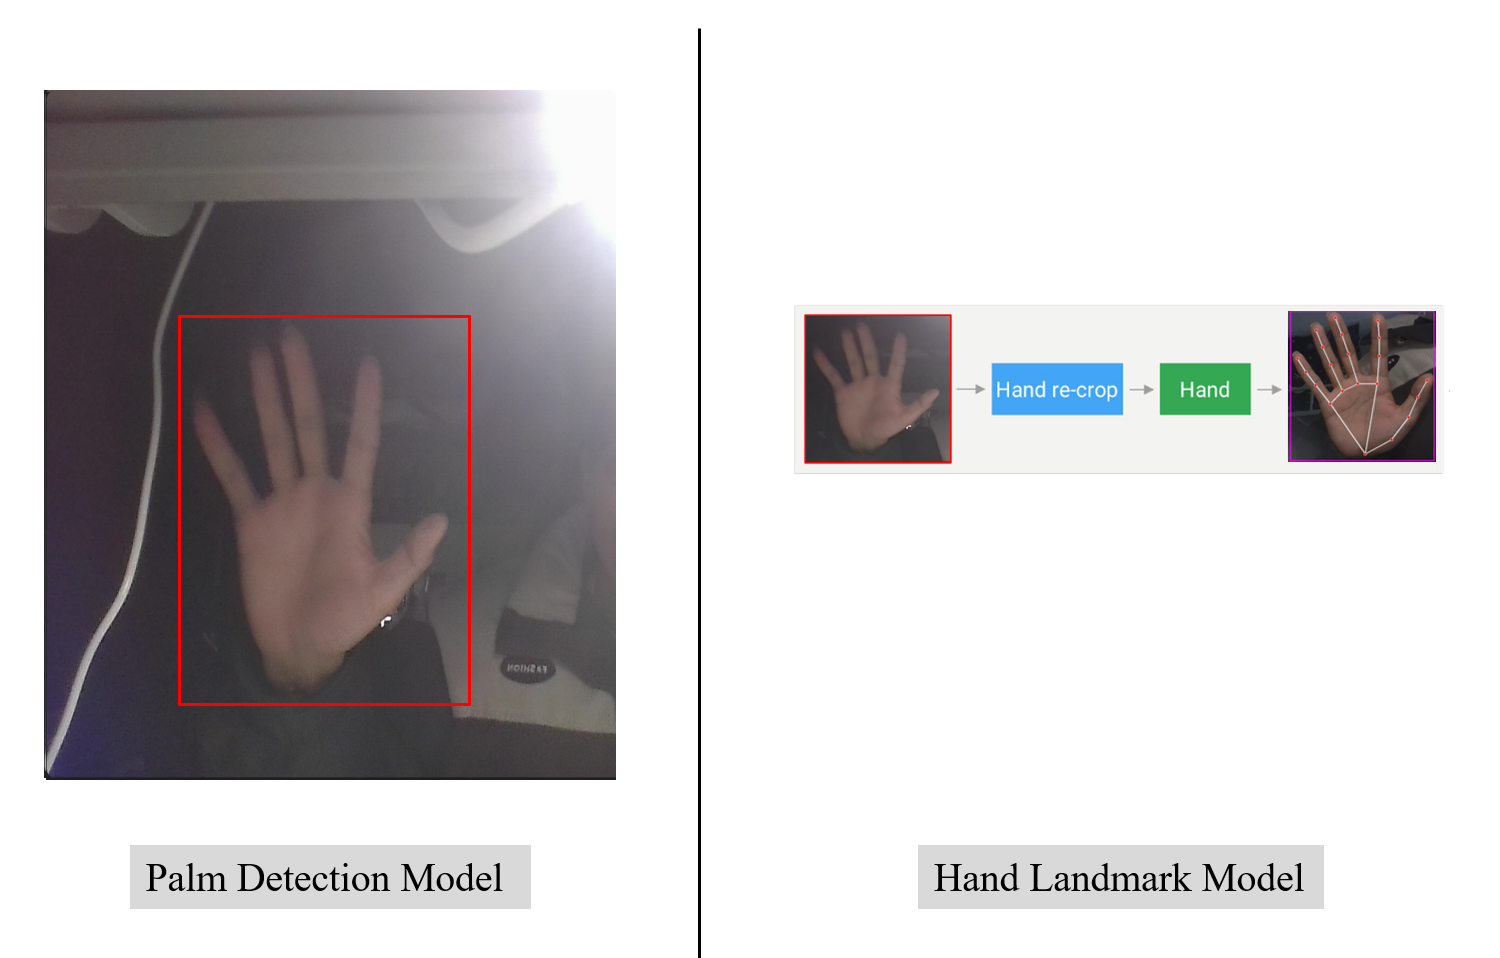
如上图所示手部关键点检测可以分为两步,第一步就是定位到手部的位置,这一部分相对较简单,使用主流的深度学习框架,通过有监督学习是很容易训练出一个精确度还不错的模型。第二步就是对第一步提取到的手部区域进行21个关键点检测,若此部分按照之前的方法进行有监督学习训练出一个模型来检测,效果是非常差的,为什么呢?因为摄像头所得到的信息是二维的,而我们手掌是三维的,且手几乎是人体最灵活的部位之一,倘若只通过简单的有监督学习进行检测是无法达到想要的效果,好在我们的脚下有巨人,早在2020年Google在计算机视觉顶会提出过一个模型GHUM[3]这里做了相关的一些工作,大概意思就是谷歌通过拍摄人体三维信息来构建一个模型,让模型能适应二维图像。

下面分别是第一步和第二步模型的一些相关参数。


PDM模型相关参数:

DETECTOR MODEL SPECIFICATIONS

Model Type

● Convolutional Neural Network

Model Architecture

● Single-shot detector model

Inputs

● A frame of video or an image, represented as a

192 x 192 x 3 tensor. Channels order: RGB with

values in [0.0, 1.0].

Output(s)

● A float tensor 2016 x 18 of predicted

embeddings representing anchors

transformation which are further used in Non

Maximum Suppression algorithm.

HLM模型相关参数:

TRACKER MODEL SPECIFICATIONS

Model Type

● Convolutional Neural Network

Model Architecture

● Regression model

Inputs

● A crop of a frame of video or an image,

represented as a 224 x 224 x 3 tensor. Channels

order: RGB with values in [0.0, 1.0].

Output(s)

● A float scalar represents the presence of a hand

in the given input image.

● 21 3-dimensional screen landmarks represented

as a 1 x 63 tensor and normalized by image size.

This output should only be considered valid

when the presence score is higher than a

threshold.

● A float scalar represents the handedness of the

predicted hand. This output should only be

considered valid when the presence score is

higher than a threshold.

● 21 3-dimensional metric scale world landmarks

represented as a 1 x 63 tensor. Predictions are

based on the GHUM hand model. This output

should only be considered valid when the

presence score is higher than a threshold.


PDM +HLM 就可以实现从原图的输入到下图手掌关键点检测的效果。下一步,下一步就可以开始虚拟计算器设计了。
image

四、基于关键点检测的手势虚拟计算器

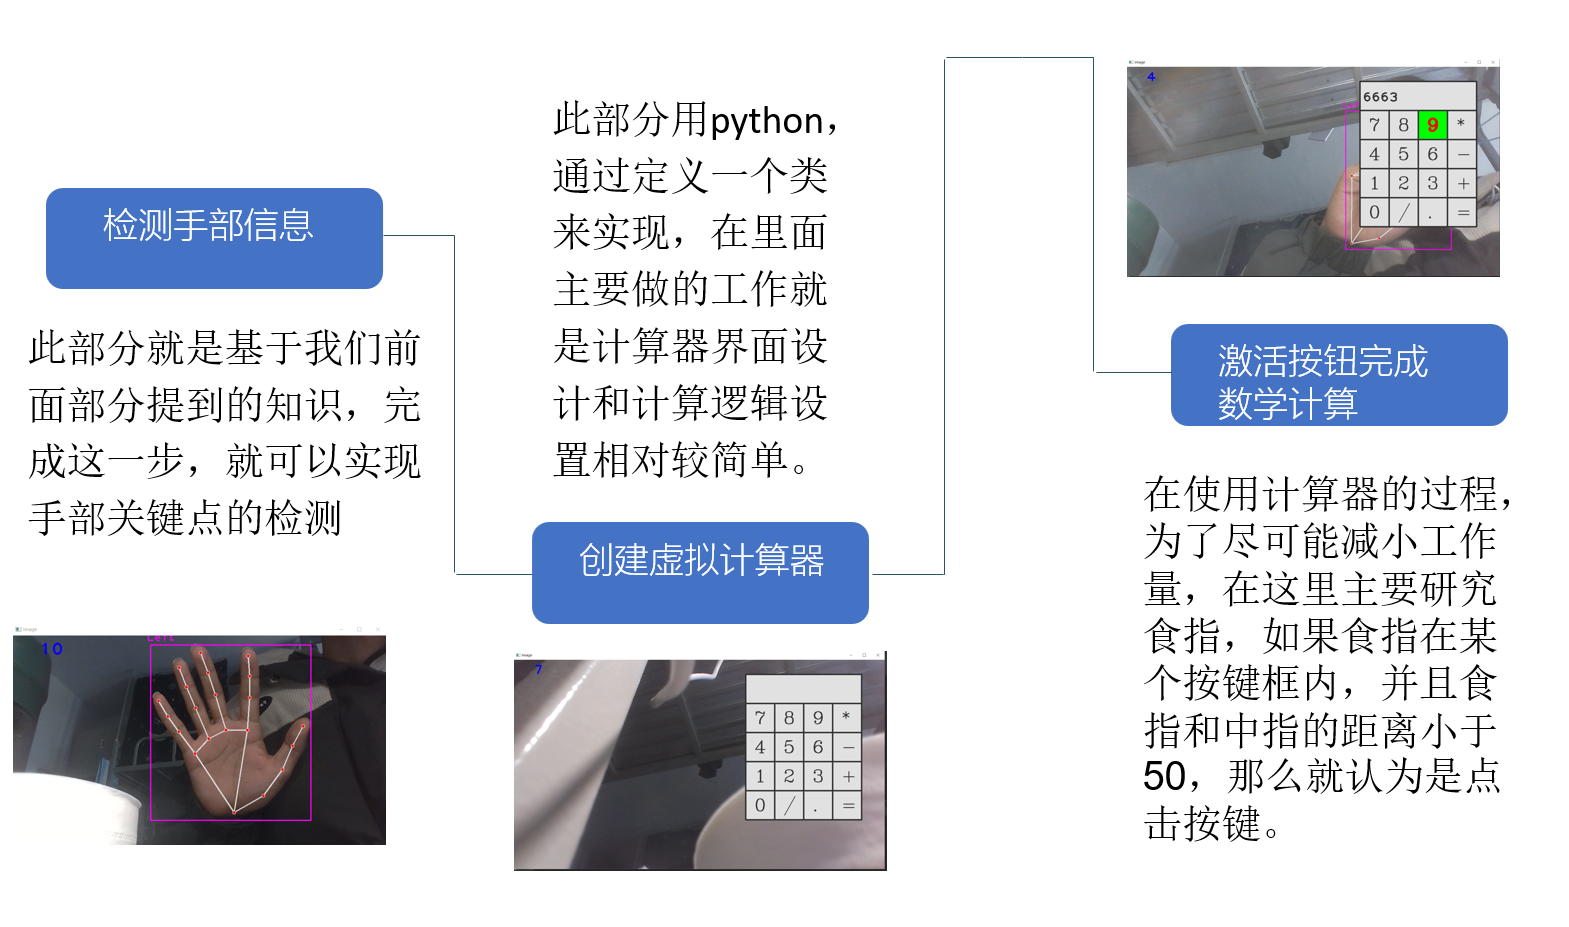
这里给出手部关键点检测的设计流程,其中第一步是检测手部信息,包括手部定位和手部关键点检测,这两步完成后就可以进行虚拟计算器界面的设计,这里用的是python进行设计,相对较简单,源码也贴在下面,感兴趣的小伙伴可以去动手尝试一下。最后一步也是最关键的一步就是将手部的运动状态和计算器的操作逻辑进行绑定,从而实现手势操控计算器的目的。
image

python源码展示[4]

1
2
3
4
5
6
7
8
9
10
11
12
13
14
15
16
17
18
19
20
21
22
23
24
25
26
27
28
29
30
31
32
33
34
35
36
37
38
39
40
41
42
43
44
45
46
47
48
49
50
51
52
53
54
55
56
57
58
59
60
61
62
63
64
65
66
67
68
69
70
71
72
73
74
75
76
77
78
79
80
81
82
83
84
85
86
87
88
89
90
91
92
93
94
95
96
97
98
99
100
101
102
103
104
105
106
107
108
109
110
111
112
113
114
115
116
117
118
119
120
121
122
123
124
125
126
127
128
129
130
131
132
133
134
135
136
137
138
139
140
141
142
143
144
145
146
147
148
149
150
151
152
153
154
155
156
157
158
159
160
161
162
163
164
165
166
167
168
169
170
171
172
173
174
175
176
177
178
179
180
181
182
183
184
185
186
187
188
189
190
191
192
193
194
195
196
197
import cv2
from cvzone.HandTrackingModule import HandDetector
import mediapipe as mp
import time


# 创建按键类
class Button:
# 初始化,传入pos按键位置,每个矩形框的宽高,矩形框上的数字value
def __init__(self, pos, width, height, value):
# 初始化在while循环之前完成
self.pos = pos
self.width = width
self.height = height
self.value = value

# 绘图方法在while循环之后完成
def draw(self, img):

# 绘制计算器轮廓,img画板,起点坐标,终点坐标,颜色填充
cv2.rectangle(img, self.pos, (self.pos[0]+self.width, self.pos[1]+self.height),
(225,225,225), cv2.FILLED)

# 给计算器添加边框
cv2.rectangle(img, self.pos, (self.pos[0]+self.width, self.pos[1]+self.height),
(50,50,50), 3)

# 按键添加文本,img画板,文本内容,坐标,字体,字体大小,字体颜色,线条宽度
cv2.putText(img, self.value, (self.pos[0]+30,self.pos[1]+70),
cv2.FONT_HERSHEY_COMPLEX, 2, (50,50,50), 2)

# 点击按钮
def checkClick(self, x, y): #传入食指尖坐标

# 检查食指x坐标在哪一个按钮框内,x1 < x < x1 + width ,控制一列
# 检查食指y坐标在哪一个按钮框内,y1 < y < y1 + height ,控制一行
if self.pos[0] < x < self.pos[0] + self.width and \
self.pos[1] < y < self.pos[1] + self.height: # '\'用来换行

# 如果点击按钮就改变按钮颜色
cv2.rectangle(img, self.pos, (self.pos[0]+self.width, self.pos[1]+self.height),
(0,255,0), cv2.FILLED)

# 边框还是原来的不变
cv2.rectangle(img, self.pos, (self.pos[0]+self.width, self.pos[1]+self.height),
(50,50,50), 3)

# 按键文本变颜色,面积变化
cv2.putText(img, self.value, (self.pos[0]+30, self.pos[1]+70),
cv2.FONT_HERSHEY_COMPLEX, 2, (0,0,255), 5)

# 如果成功点击按钮就返回True
return True

else:
return False


#(1)捕获摄像头
cap = cv2.VideoCapture(0)
cap.set(3, 1280) # 显示框的宽1280
cap.set(4, 720) # 显示框的高720

pTime = 0 # 设置第一帧开始处理的起始时间

# ==1== 手部检测方法,置信度为0.8,最多检测一只手
detector = HandDetector(detectionCon=0.8, maxHands=1)

# ==2== 创建计算器按键
# 创建按钮内容列表
buttonListvalues = [['7', '8', '9', '*'],
['4', '5', '6', '-'],
['1', '2', '3', '+'],
['0', '/', '.', '=']]

buttonList = [] #存放每个按键的信息

# 创建4*4个按键
for x in range(4): # 四列
for y in range(4): # 四行
xpos = x * 100 + 800 #得到四块宽为100的矩形的起点x坐标,从x=800开始
ypos = y * 100 + 150 #起点y坐标

# 传入起点坐标及宽高
button1 = Button((xpos,ypos), 100, 100, buttonListvalues[y][x])
buttonList.append(button1) # 将确定坐标的矩形框信息存入列表中

# ==3== 初始化结果显示框
myEquation = ''
# eval('5'+'5') ==> 10,eval()函数将数字字符串转换成数字计算
delayCounter = 0 #添加计数器,一次点击触发一次按钮,避免重复


#(2)处理每一帧图像
while True:

# 接收图片是否导入成功、帧图像
success, img = cap.read()

# 翻转图像,保证摄像机画面和人的动作是镜像
img = cv2.flip(img, flipCode=1) #0竖直翻转,1水平翻转


#(3)检测手部关键点,返回所有绘制后的图像
hands, img = detector.findHands(img, flipType=False)


#(4)绘制计算器
# 绘制计算器显示结果的部分,四个按键的宽合起来是400
cv2.rectangle(img, (800, 50), (800+400, 70+100), (225,225,225), cv2.FILLED)

# 结果框轮廓
cv2.rectangle(img, (800, 50), (800+400, 70+100), (50,50,50), 3)

# 遍历列表,调用类中的draw方法,绘制每个按键
for button in buttonList:
button.draw(img)


#(5)检测手按了哪个键
if hands: #如果手部关键点返回的列表不为空,证明检测到了手

# 0代表第一只手,由于我们设置了只检测一只手,所以0就代表检测到的那只
lmlist = hands[0]['lmList']

# 获取食指和中指的指尖距离并绘制连线
# 返回指尖连线长度,线条信息,绘制后的图像
length, _, img = detector.findDistance(lmlist[8], lmlist[12], img)
# print(length)

x, y = lmlist[8] # 获取食指坐标
# 如果指尖距离小于50,找到按下了哪个键
if length < 50:
for i, button in enumerate(buttonList): # 遍历所有按键,找到食指尖在哪个按键内

# 点击按键,按键颜色面积发生变化,返回True。并且延时器为0才能运行
if button.checkClick(x,y) and delayCounter==0:

#(6)数值计算
# 找到点击的按钮的编号i,i是0-15,
# 如"4",索引为4,位置[1][0],等同于[i%4][i//4]
# print(buttonListvalues[i%4][i//4])
myValue = buttonListvalues[i%4][i//4]

# 如果点的是'='号
if myValue == '=':
# eval()使字符串数字和符号直接做计算, eval('5 * 6 - 2')
myEquation = str(eval(myEquation)) #eval返回一个数值

else:
# 第一次点击"5",第二次点击"6",需要显示的是56
myEquation += myValue # 字符串直接相加

# 避免重复,方法一,不推荐:
# time.sleep(0.2)

delayCounter = 1 # 启动计数器,一次运行点击了一个键


#(7)避免点一次出现多个相同数,方法二:
# 点击一个按钮之后,delayCounter=1,20帧后才能点击下一个
if delayCounter != 0:
delayCounter += 1 # 延迟一帧
if delayCounter > 50: # 10帧过去了才能再点击
delayCounter = 0


#(8)绘制显示的计算表达式
cv2.putText(img, myEquation, (800+10,100+20), cv2.FONT_HERSHEY_PLAIN,
3, (50,50,50), 3)


# 查看FPS
cTime = time.time() #处理完一帧图像的时间
fps = 1/(cTime-pTime)
pTime = cTime #重置起始时间

# 在视频上显示fps信息,先转换成整数再变成字符串形式,文本显示坐标,文本字体,文本大小
cv2.putText(img, str(int(fps)), (70,50), cv2.FONT_HERSHEY_PLAIN, 3, (255,0,0), 3)

# 显示图像,输入窗口名及图像数据
cv2.imshow('image', img)

# 每帧滞留时间
key = cv2.waitKey(1)

# 清空计算器框
if key == ord('c'):
myEquation = ''

# 退出显示
if key & 0xFF==27: #每帧滞留20毫秒后消失,ESC键退出
break

# 释放视频资源
cap.release()
cv2.destroyAllWindows()

五、Demo展示

最后一部分就是一个小Demo。

参考文献